Thursday, July 30, 2015

Crochet Dress for Barbie

A friend gifted my lil one a Barbie doll for her birthday. Well, I was the one who was more excited than she was! The doll was a pretty one with brown lush hair and lots of accessories. The only thing I did not like about her was her dress. It was way to small for her and kept sliding up her hip always and the upper portion kept falling of her shoulders. And needless to say, the dress was gone in few days time.

The poor thing lay naked in the toy basket. Every time I saw it, I felt pity. Finally, it occurred to me that I should make a small dress for her. Well, I wished and it was done.

It would not have taken one hour to make. It was super easy, fast, and cute. Here it is.


And how can you not show off her curves.


Well, now she looks very neat and cute. No more embarrassment.


I have used single, double, and treble crochet stitches for the dress. It is loosely based on the Lacy Crochet Dress I made for my daughter last year.


It was a quick, easy, and cute project.

Play Tent

Being a kid I loved play tents. I never had one officially but we did make temporary ones to play. When my daughter started growing up and playing by self I wanted to create one for her. I really wanted to satisfy my craving for a cute tent. 

So the first one was built even before she was a year old. Though she did not understand the concept, she kind of used it to play peek-a-boo or at times just hide from us. I never posted it here. It was build by a window and was very tall with small shiny things hung in it to keep her entertained. This was built in the house where we stayed before moving into our own. 

After moving into our house, I started browsing for tent options. I did not want a permanent one. Not too big. I should be able to keep an eye on her from the kitchen. And so on were my conditions. I was pretty impressed with the PVC pipe tent ideas on Pinterest. I really wanted to do one. We even went and checked the pipes. But we had after thoughts and dropped the idea.


Finally, two weeks back I figured out an easy and temporary solution for the Play Tent. We have put the sofa in the living room as an L-shape and the back of the two seater faces the kitchen. I decided that the tent should be built at the back of the sofa so that I can keep a watch on her when I am in the kitchen and it would not be visible from the entry to the house as well.


And it was done!


Can you make out what it is? No? Okay, let's see the details. It is semi-circular and big enough for my lil one to sleep with her doll in it (which she often does) :-)


This is the framework. Very simple!

I removed the flexible bars of her play gym and secured it to the back of the sofa in a semi-circle. Before securing it, I slid two PVC T-connectors into it. The connector was hubby's idea.

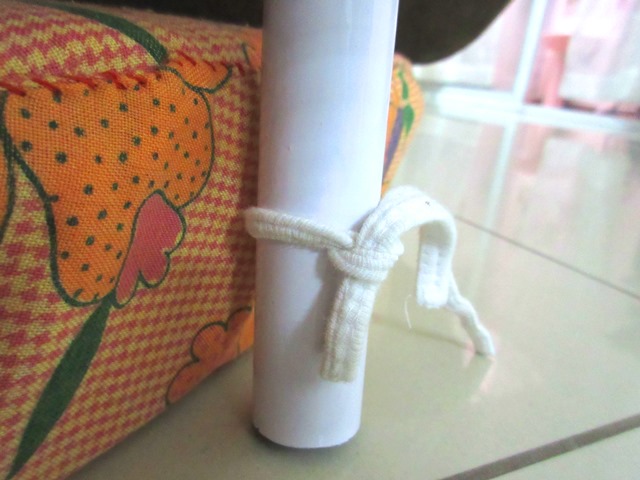
Into the T-connector I fixed two PVC pipes (painted it white too). 

Then I cut out the shape similar to the top portion of the tent, from an old foam bed. Sewed up a cheerful cover for it.


Sewed in two cords to the foam and secured the pipes in position.


See, it stays in place and does not slide of.

Draped a lovely, see-through cloth over the frame. 


And my (her) tent was ready!


The best part about it is that it is very easy to be taken apart and rebuilt everyday. Just take out the pipes from the connector along with the foam. The top portion falls flat to the back of the sofa. So simple. To build it back, I just need to put the pipe ends in the connectors. 

Thursday, July 23, 2015

Pretty Gardening

I have been away for a really long while. There was nothing crafty happening all these days. It was not like I did not want to do anything crafty but I never found that crafty-time. I was mostly drained out and lacked the enthusiasm to pick up my hook and yarn. There was always a list of TO-DO tasks in front of me and I felt guilty if I even thought about indulging in some craftiness to satisfy my creative needs.

However, I realized that my tasks will always be there whether I craft or not. 


My balcony has some pots and plants. I do not spend much time with my plants now. But how much ever time I spent tending them, I did not like those brown plastic pots, all kept in row. Provided that my balcony is not too wide, I do not have any other options than the pots. So I decided that I'll add some colors to it. 


See how it looked before. 


This was a difficult task than I expected it to be. I had to apply two coats of paint as the pots are plastic and I bought enamel paints for a glossy finish. And when I started the project, the weather was not too great. It took longer to dry. 


Another challenge was placing the pots to dry. I could not keep it close to the balcony glass and also had to keep constant watch on my toddler whenever entry to the balcony was open. There were lot of challenges - the mess, the cleanup, time, weather, space constraint, weight of the pots with the plants to move it around, and so on. 


See an in progress picture.


This is how my balcony looked like on many early weekend mornings.


I was never able to paint more than one or two pots in a sitting. So the project did actually span over some time. And till it was completed, the balcony was kind of non-functional. Each time I painted a pot, I had to clean up the brushes, throw away the newspaper sheets used, and have everything shoved out of reached before the little hands touched them. I had to get up early on weekends to get an hour or so to paint. Sometimes I used to paint these pots at midnight after putting my little one to bed. 


And finally I achieved it. 


You can see the drip marks on the wooden plank placed beneath the pots. That is another thing on my TO-DO list! Phew!


As you see, I tried using two shades for most of the pots. It was again time consuming. I had to put tapes at the dividing area. Paint one portion. Wait for it to dry. Apply one more coat. Again wait for it to dry. Remove the tape and paint the second portion. Wait for it to dry and apply second coat. That was when one pot could be called complete. It was tedious.  


Some are in single random shades.


I experimented mixing the colors to create shades. Some turned out way too awful and I had to throw it away.  

But I loved the result. My colors may not be too bright or great. But now my balcony is definitely prettier than it was. 


I am just imagining bright orange marigolds and roses in full bloom in the colorful pots on my balcony. I may have to wait little longer for that. 


Will I take up these projects again? Yes, I definitely would. For the love of colors and now I have learned few things from my mistakes :-)